02 September 2014

Blueberry Tartlets


Hello! How are you? Finally I'm back after long period, probably you think I was on vacation, but not, I wish I was but I really was not. I've just took some days off to visit my family but I really needed to enjoy the weekends and my free time after work, so the posts had to wait, but my kithchen didn't stop. This one never stops when I'm at home, so today I'm back with these tartlets I did several weeks ago. The part I really like the most of this recipe is the crust, the cornmeal gives an special texture and taste to this delight. You can top with any fruit you like the best, in my case I used blueberries. Recipe from the crust is adapted from Martha Stewart.


Blueberry Tartlets
Makes 5 8 cm pans
crust: 
125 g normal flour
70 g cornmeal
40 g white sugar
1/4 teaspoon salt
105 g cold unsalted butter
4 tablespoons grated coconut
1 large ecc yolk
1/2 teaspoon vanilla paste

Preheat the oven to 160º. Mix all the ingredients in a bowl with an electric hand mixer until it just begins to come together. Divide mixture into 5 pieces and press the dough into the bottoms and the sides of the pans, with a removable bottom, do not grease the pans. Blind bake crust for 10 minutes, remove paper and weights and continue baking until crusts are golden brown over, about 5 minutes. Let cool completely on a wire rack.

filling: 
1 cup milk
1/2 tbs vanilla extract or vanilla bean
2 large egg yolks
50 g sugar
15 g cornstarch
fresh blueberrys for topping

Put the milk and vanilla in a saucepan until starts boiling. Remove from heat, cover and let stand for 20 minutes.
Whisk egg yolks until smooth and reserve.
Put sugar and cronstarch in a saucepan and add gradually the milk mixture and cook over medium heat, stirring constantly, until mixture thikens and begins to bubble, about 5 minutes.
Whisking constantly, slowly pour one-third of milk mixture into egg yolks. Pour mixture into remaining milk in saucepan. Cook over medium heat, whisking constantly, until mixture comes to a full boil and is thick enough.
Cover with plastic wrap, pressing directly on surface. Refrigerate at least 2 hours or up to 2 days. Before using whisk to soften slightly.

Fill tartlets shells with the cream and top with the fresh blueberries. 


If you love tartlets just like me check out these cherry ones, or with strawberries, or one of my favorites.

Have a nice week

♥♥♥

16 July 2014

Summer Salad


Hi! how are you doing? I was not on holidays I just took a week off and I did not upload a recipe last week as I use to do, I still need to think about that if I will do it biweekly or next week I will come with a new idea, but even I'm busy at the office I'm really lazy when I come back home, I only want to enjoy the afteroons and weekends, by the way the coming weekend I'm going back to Barcelona! Well as you can see I'm also lazzy with the recipes and today I come with a simple salad, simple but really tasty and perfect for these summer days. I love advocado and prawns, so together do a very good combination. Hope you enjoy it!


Summer Salad
200 g iceberg salad
250 g cooked prawns
1 advocado
mayonnaise
sal and pepper
fresh dill
1 lima

Chop the iceberg salad and place it in a plate. Cube the advocado and place it in a small bowl, squeeze half of the lima and mix it well to prevent oxidation. Put the advocado cubes and prawns all over the plate. Slice the other half of the lima and put it at the side, drizzle some salt, pepper and dill. Serve aside the mayonnese. Serve it with a bowl aside with mayonnaise mixed with some chopped dill. 


Another salad idea check this one.

Have a nice week

♥♥♥

02 July 2014

Banoffee Pie


Hello! New month and new recipe. This is a classic of the English desserts. I love this pie, specially in summer time, due this cake doesn't needs oven. You can get the toffee filling from a boiled condensed milk or using a jar of dulce de leche. But I will show you an other way which I rather than to cook the condensed milk. The process to to cook the can takes 2 hours, so there is an other way much faster and also delicious to make an smooth and tasty toffe. But if you can get a real dulce de leche jar just use it!


Banoffee Pie
Makes a 25 cm round pan
base: 
250 g digestives cookies crunched
100 g melted unsalted butter

filling: 
400 g condensed milk
100 g light brown sugar
100 g unsalted butter
4 bananas
400 g heavy cream
8 g vanilla sugar
pecan nuts for topping

Crush the biscuits in a food processor or in a plastic bag, seal the bag and crush with a rolling pin. Add the melted butter and mix together. Place this mixture in a tin and press with the bag of a spoon all over the base and the sides. Place it in the fridge.

Melt de butter in a pan on a low heat and add the suger, mix it until sugar has dissolved. Add the condensed milk and and bring it to boild for about 2 minutes, stirring all the time to thikens and gets golden. Spread the caramel all over the cookie base, cool and then put it in the fridge for about 1 hour, until firm.

Slice de bananas and place them all over the toffee. Beat the cream with the vanilla sugar until it form peaks and speard it all over the bananas. Top with pecan nuts.

If you want to see the result after few hours in the fridge you can check my instagram and you will see the perfect cut you get after cooling.

Have a nice week

♥♥♥
26 June 2014

Raspberry Panna Cotta


Hello!! It has been quite a long time since my last publication, but as a lot of you probably know I went on vacation. I spend some days in the beautiful Algarve, in the south of Portugal. You can check some of the pictures I took on my instagram. If you have the chance you have to go! Lovely lanscapes, amazing views, nice people and the most important delicious and cheap food almos everywhere. 
Todays I have a soft and yummy panna cotta with raspberries, and the raspberries are from my little orchard! yes! well acutally the amount you see in the picture was all I could get last weekend and I top this dessert. For the coulis in the base I used frozen ones. I would wish to have a bigger orchard.


Raspberry Panna Cotta
serves 6 
coulis:
200 g raspberries
zest and juice of half lemon
2 tablespoons sugar

panna cotta: 
250 ml heavy cream
250 ml whole milk
50 g sugar
3 gelatin sheets
5 cardamom seeds
1 vanilla stick
fresh raspberries for topping

For the coulis blend de raspberries first. Combine the sugar and the raspberries in a saucepand and bring it to boil. Add the juice and the grate of the lemon and stir until thinkens. Let it cool down for a while and divide it among the pots. Place them in the fridge while you prepare the panna cotta.

Heat the heavy cream, the milk and  sugar in a saucepan with the vanilla and the cardamom pods open. Bring it to simmer for about 5 minutes. Remove from the heat, cover an leave to infuse for 20 minutes. In the meanwhile put the gelatin into a bowl with cold water for 5 minutes. 
Remove vanilla and cardamom and if too cold heat it for a while before you add the gelatin. 
Drain the gelatin and add it to the mixture, stir and divide the mixture among the pots.

Refrigerate until set and thoroughly chilled, 3-4 hours or better overnight.
Top with fresh raspberries.


If you like panna cotta you can check out this chocolate one.
What's about you, any special plans for the summer?

Enjoy your week
♥♥♥

03 June 2014

Smoothie for the tan


I use to make smoothies quite often and now which summer days are coming I do smoothies even more often, almost everyday. I´m going on vacation tomorrow! yes! to Algarve, I´m really so excited, I know Portugal from Lisbon to the top of the country, but I never been in the south, so any recomendation will be welcome!
So I decided to prepare the skin for the sun. Take all your orange colour fruits and vegetables and blend them, it really helps. The experts say it is not necessary to spend money in artificial stuff from pharmacy or any other store, all we need is in the magic foods such as carrot, pumkin, mango, papaya, orange, tomato and much more all of them help to maximize the skin pigmentation, but do not forget your skin protection! Since few years ago my skin turned more sensitive, I´m not a person who gets tan, actually the other way around, I have quite a lot of freckles, so my skin could never get tan, but just to get some color, everybody looks much better with a light tan, don´t you think so?
I'm not going to give you the exactly amount of each ingredients because what I really do is mix all what I have and just ajust the ingredients at my taste.


Carrot and Mango Smoothie
frozen mango chunks (about 250 g)
carrots (about 3 or 4)
cucumber (half medium cucumber)
orange juice (2 oranges)


Blend all ingredients until smooth, you may want to add more liquid if the consistency is too thick, instead orange juice you can also use water.
Serve inmediately.

With these ingredients I did the one you can see in the pictures, but I like to include sometimes banana as well, it gives more sweetness. If you want you can add some teaspoons of honey or sweetener. 


If you like smoothies try as well with a green smoothie, I do not like to mix it milk or wather in there, instead I use juice such as lemon or orange. But a milky option which I love also are lassis.

Protect your skin and enjoy!

See you in two weeks and if you want you can follow me on instagram I will try to upload some pictures of my trip 

♥♥♥

27 May 2014

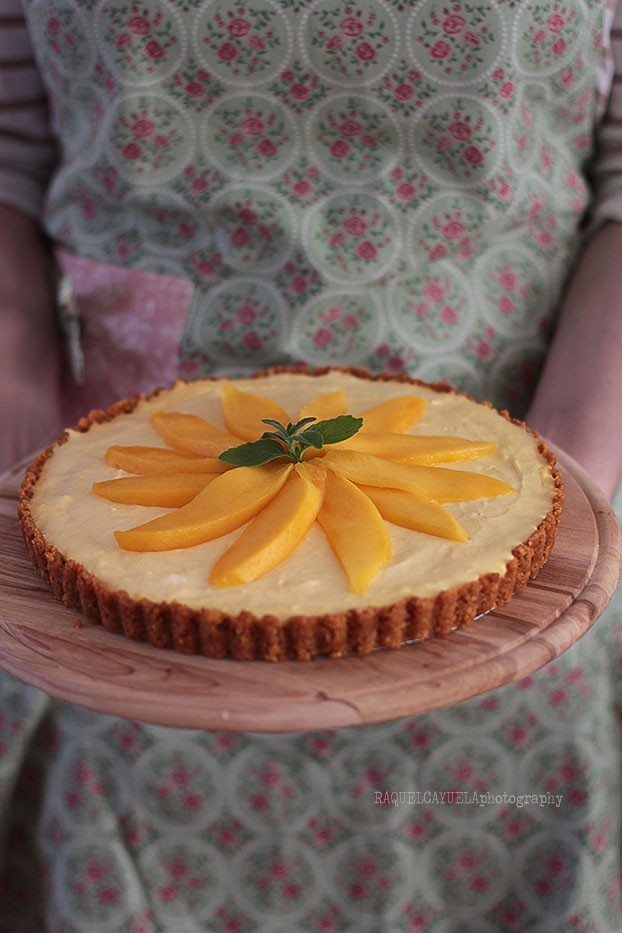
Mango Tart


Hello! how was your weekend? Mine was perfect and one of the reasons is that I bought a new bicycle, I´m really in love with it! You can have a look to it on my instagram. Since the moment I arrive in the Netherlands I was looking foward to have one like this, so I´m so excited with it! Today I even got sad cause it was raining and I could not cycle, I know! here no matter if it rains, snows or winds, everybody cycles anyway, but I´m not enough adapted, not yet!
Todays recipes is fresh, yummy, quick to make and the best thing is a no bake tart! For the base I used biscuits with stem ginger, which gives an special touch to this tart. I got the biscuits in the box of Degustabox. You can easily use your favorite biscuit, or add real stem ginger to the mixture.


No bake Mango Tart
makes a 20 cm round pan 
crust:
200 g cookies (I used ginger cookies)
75 g melted butter
filling:
300 g fresh mango, peeled and cored, plus some more to decorate
100 g condensed milk
250 ml heavy cream
4 sheets gelatin


Crush the cookies and mix them with the melted butter, cover the tart tin pressing with the back of the spoon. Refrigerate.
In the meanwhile prepare the filling. Blend the mango and mix in the condensed milk. Put the gelatin sheets in cold water for 5 minutes. Put some of the heavy cream, about 30 ml in the pan and heat it, remove just when starts boiling. Drain the gelatin and put into the pan, mix it well. Let it cool before mix it back with the rest of the mixture.
In a separate bowl beat the rest of the heavy cream with an electric whisk until it forms peaks. Add the gelatin mixture and the cream  and stir with and spatula gently until well combined.
Fill the pan, level and refrigerate at least for 4 hours or better overnight.
Before serving slice some extra mango and decorate the cake, I used some fresh menta as well. 


If you liked this cake you can have a look to this one with lemon and blueberries.

Have a nice week  ♥

21 May 2014

Chocolate Beetroot Cake


You all probably are familiar to cakes made with a vegetable such as carrot, crougette or pumpkin, but it is really funny to see the face of some people when you say the cake has been made with beetroot. The best is to appreciate their face once they tasted the cake. You know already what I´m talking about. So that happend to me as well with this chocolate beetroot cake. I love it, specially the moisture and the instense chocolate flavour. 


Chocolate Beetroot Cake
makes a 20 cm round pan
200 g dark chocolate 
150 g light brown sugar 
80 g vegetable oil 
2 large eggs 
1 teaspoon vanilla paste 
100 g flour 
1 tablespoon cocoa powder 
1 teaspoon baking powder 
1/4 teaspoon bicarbonate of soda 
1 pinch of salt 
200 g cooked beetroot


Preheat oven to 180º and grease the pan with spray or butter. 
Melt the chocolate in a double boiler and set aside to cool. Blend the beetroot, it is not necessary to make a puree, you can also grate it.
Sift the flour, the cocoa, the salt, the baking powder and bicarbonate in a bowl and set a side.
In a seperate bowl mix the sugar and the oil until light and fluffy, add the eggs one at the time, add the vanilla and mix it well.
Add the sifted ingredients and mix gently just until incorporated.  Finally add the beetroot and the chocolate and mix it with an spatula.
Pour the mixture in a greased pan and bake it for 40-50 minutes or until you insert a skewer it wil come out almos clean of crumbs.
Remove from the oven and let the cake cool down for 10 minutes in the pan, transfer it later to a wire rack.

chocolate ganache:
100 g dark chocolate
150 g heavy cream

Put the cream in a saucepan over medium heat and heat until just strats to bubble around the edges. Remove from heat and stir in the chocolate chopped. Stir until chocolate has completly melted. 


Have a nice week  ♥